Creating a local variable
A local variable is specific to a Campaign. In the
Campaign > Variables tab, you can create a
CampaignRecipient variable so that there is a separate value for this variable for each recipient in the campaign.
Procedure
- Click the
 button at the bottom of the screen. button at the bottom of the screen.
The following screen is displayed:
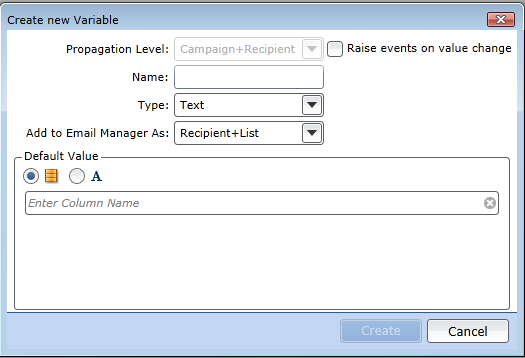
- Propagation Level : OnlyCampaignRecipient variables can be created from the
Campaign
> Variables tab.
- CampaignRecipient : This means that there is a separate value for this variable for each recipient in the campaign. This type of variable can be used within campaign cells.
For example , John Smith can have the value '1,000' for variable
Credit _Limit in Campaign_A; Jane Doe can have the value '2,000' for the same variable in the same campaign. In Campaign_B both recipients can have different values for the same variable.
- Raise events on value change: Checking this box enables the variable for use in trigger processing within the campaign. Variables that have this box checked will appear on the Triggers tab of the campaign. The variable can then be configured to generate an event when the value of the variable changes for the recipient.
- Name : Provide a name for the variable that is unique in the campaign.
- Type : Select the field type:
- Add to Email Manager As: This setting is used to determine the data storage path for Send a message tactics sent to Email Manager. The default value is Recipient + List, but can be amended to Recipient if required.
- Default Value:
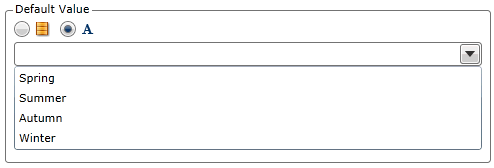
The possible values can be derived from a database column or you can manually enter a list of choices:
 Database : Click into the column field and select the required column. You can also drag in a column from the Database Explorer. Database : Click into the column field and select the required column. You can also drag in a column from the Database Explorer.
 Choice List : Enter the variable choices, separated by a carriage return, each on a new line. You can then select one of the choices from the drop-down to be the default value. Choice List : Enter the variable choices, separated by a carriage return, each on a new line. You can then select one of the choices from the drop-down to be the default value.
- Click OK.
Your new variable will be displayed on the workspace with a number of configuration options.
|
|


